# DNS API
{% hint style="info" %}
Domain names can be onboarded through DNS settings, utilizing the DNS ACME Challenge for certificate issuance, and supporting Wildcard certificate requests. The domain must be hosted with the DNS provider; please refer to the DNS provider's documentation for the specific procedures.
{% endhint %}
### How to Set Up DNS API?
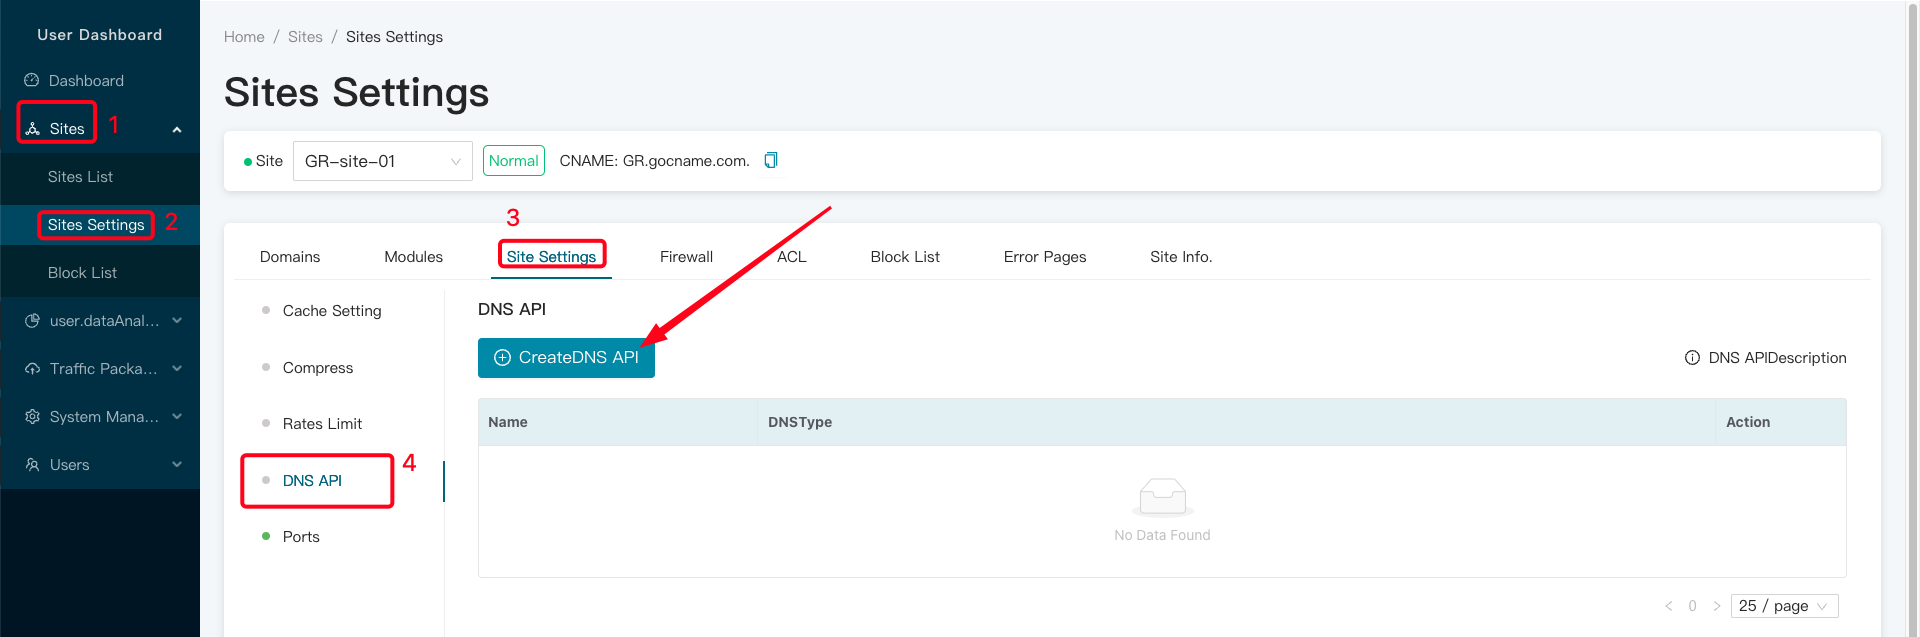
* Navigate to Sites -> Sites Settings -> Site Settings -> DNS API -> Create DNS API
* **Name**: Customizable Name
* **Supported Providers**: Aliyun, Cloudflare, DNSPod, HuaweiCloud, GoDaddy. Click on the DNS provider you want to integrate with.
***
### Configuring DNS API with GoDaddy:
* Ensure Domain Hosting: First, confirm that the domain is hosted with GoDaddy.
* Log into GoDaddy API:
* Navigate to API Keys.
* Click on Create API Key.
* The Name (Optional) can be customized or left blank, the Environment is generally set to Production, then click Next.
* Next, the Key and Secret will appear; make sure to record them.
* Return to the CDN platform:
* Sites -> Sites Settings -> Site Settings -> DNS API -> Create DNS API -> Select GoDaddy as the DNS type.
* Enter the Key and Secret provided by GoDaddy, then click "Add".
* Navigate to Domains -> Select the Wildcard Domain for Certificate Application.
* Check "Auto SSL" and "Apply for a Certificate Using DNS Verification".
* Go to DNS API Settings and select the configuration just added.
* Finally, click Confirm and wait for the certificate application to complete.
***
### Configuring DNS API with Cloudflare:
* Ensure Domain Hosting: First, confirm that the domain is hosted with Cloudflare's DNS.
* Log into Cloudflare
* Click on the top-right corner -> My Profile.
* From the left-hand menu, click on API Tokens.
* In the center of the screen, click Create Token.
* Find Edit zone DNS, click on Template.
* Under Zone Resources, select the domain for which you want to apply.
* Click Continue to Summary -> Create Token.
* After the token is generated, copy it down.
* Return to the CDN platform:
* Sites -> Sites Settings -> Site Settings -> DNS API -> Create DNS API -> Select Cloudflare as the DNS type.
* Paste the copied Token into the API Token field.
* Navigate to Domains -> Select the Wildcard Domain for Certificate Application.
* Check "Auto SSL" and "Apply for a Certificate Using DNS Verification".
* Go to DNS API Settings and select the configuration just added.
* Finally, click Confirm and wait for the certificate application to complete.
***
### Configuring DNS API with Huawei Cloud
* Ensure Domain Name Management: First, confirm that the domain name has been delegated to Huawei DNS.
* Log into Huawei Cloud: Access your Huawei Cloud account.
* Navigate to DNS Service: Click on the top left corner and select "Domain Name Service".
* Here, we need to configure the domain name for which you want to apply for a certificate. For example, to apply for \*.abc.com, you should set abc.com.
* Next, you need to obtain an Access Key ID. Move your mouse to the top right corner, and from the dropdown menu, click on "My Credentials".
* Click on Create New Access Key.
* After creation, download the key. The content of the downloaded file will display the Access Key ID and Secret Access Key. These must be securely stored.
* eturn to the CDN Platform:
* Sites -> Sites Settings -> Site Settings -> DNS API -> Create DNS API
* Choose HuaweiCloud as the DNS Type.
* Enter the Access Key and Secret Access Key you obtained.
* For Region ID, select China-Hong Kong unless specified otherwise.
* Navigate to Domains -> Select the Wildcard Domain for Certificate Application.
* Check "Auto SSL" and "Apply for a Certificate Using DNS Verification".
* Go to DNS API Settings and select the configuration just added.
* Finally, click Confirm and wait for the certificate application to complete.
***
### Configuring DNS API with **Ali Cloud**
* First, ensure that the domain name is hosted on Ali Cloud.
* Log in to Ali Cloud.
* Click on the top right corner and select "AccessKey".
* Click on "Create AccessKey".
* Securely save the generated AccessKey ID and AccessKey Secret.
* Return to the CDN platform.
* Navigate to Sites -> Sites Settings -> Site Settings -> DNS API -> Creat DNS API.
* For DNS Type, select Ali Cloud DNS.
* Enter the AccessKey ID and AccessKey Secret that were just created, then click Add.
* Go to Domain Management -> Select the wildcard domain for which you want to apply for a certificate.
* Check the boxes for "Auto SSL" and "Apply for a Certificate Using DNS Verification".
* In the DNS API Settings, choose the configuration you added earlier.
* Finally, click Confirm and wait for the certificate application to complete.
***
### Configuring DNS API with **DNSPod**
* First, ensure that the domain name is hosted on DNSPod.
* Log in to DNSPod.
* Click on the top right corner and select "AccessKey".
* Click on "Create AccessKey".
* Securely save the generated AccessKey ID and AccessKey Secret.
* Return to the CDN platform:
* Sites -> Sites Settings -> Site Settings -> DNS API -> Create DNS API -> Select DNSPod as the DNS type.
* Paste the copied Token into the API Token field.
* Go to Domain Management -> Select the wildcard domain for which you want to apply for a certificate.
* Check the boxes for "Auto SSL" and "Apply for a Certificate Using DNS Verification".
* In the DNS API Settings, choose the configuration you added earlier.
* Finally, click Confirm and wait for the certificate application to complete.
---
# Agent Instructions: Querying This Documentation
If you need additional information that is not directly available in this page, you can query the documentation dynamically by asking a question.
Perform an HTTP GET request on the current page URL with the `ask` query parameter:
```
GET https://doc.user.cdnray.net/en/site-settings/dns-api.md?ask=
```
The question should be specific, self-contained, and written in natural language.
The response will contain a direct answer to the question and relevant excerpts and sources from the documentation.
Use this mechanism when the answer is not explicitly present in the current page, you need clarification or additional context, or you want to retrieve related documentation sections.